Certificate Pinning with Flutter
Guide to implement certificate pinning in Flutter applications using Dart.
One of the most common recommendations when developing mobile applications is Certificate Pinning, and in this article we’ll see a simple method to implement it in our applications built with Flutter.
What is it?
Certificate Pinning is, in short, a way to verify the identity of the server we are communicating with and thus secure the network traffic of an application. This way, our application only trusts exclusively requests from and to the server whose certificate we are specifying within our application.
All other network traffic to servers whose certificates our application doesn’t recognize will be rejected.
Implementing Certificate Pinning
Let’s see in a few steps a simple and easy way to implement Certificate Pinning in Flutter. In this example, we’ll use one of the most well-known and recognized open APIs: PokeAPI.
PokeAPI is a RESTful API open to the public that doesn’t require registration or an access key, and provides the list of all Pokemon for free.
Step 1: Obtain the SSL Certificate from the server
The first thing we need to do is obtain the SSL Certificate in .pem format, a user-friendly format to work with. In this case, to obtain the certificate we’ll use the Firefox web browser, which has a very useful built-in tool to review the certificates of the web pages we visit.
We go to the PokeAPI website, and to see the certificate, we go to the Tools → Page Info option or use the keyboard shortcut Cmd + i.

Once we have selected the option to view the page information, we go to the Security tab and click the View Certificate button.
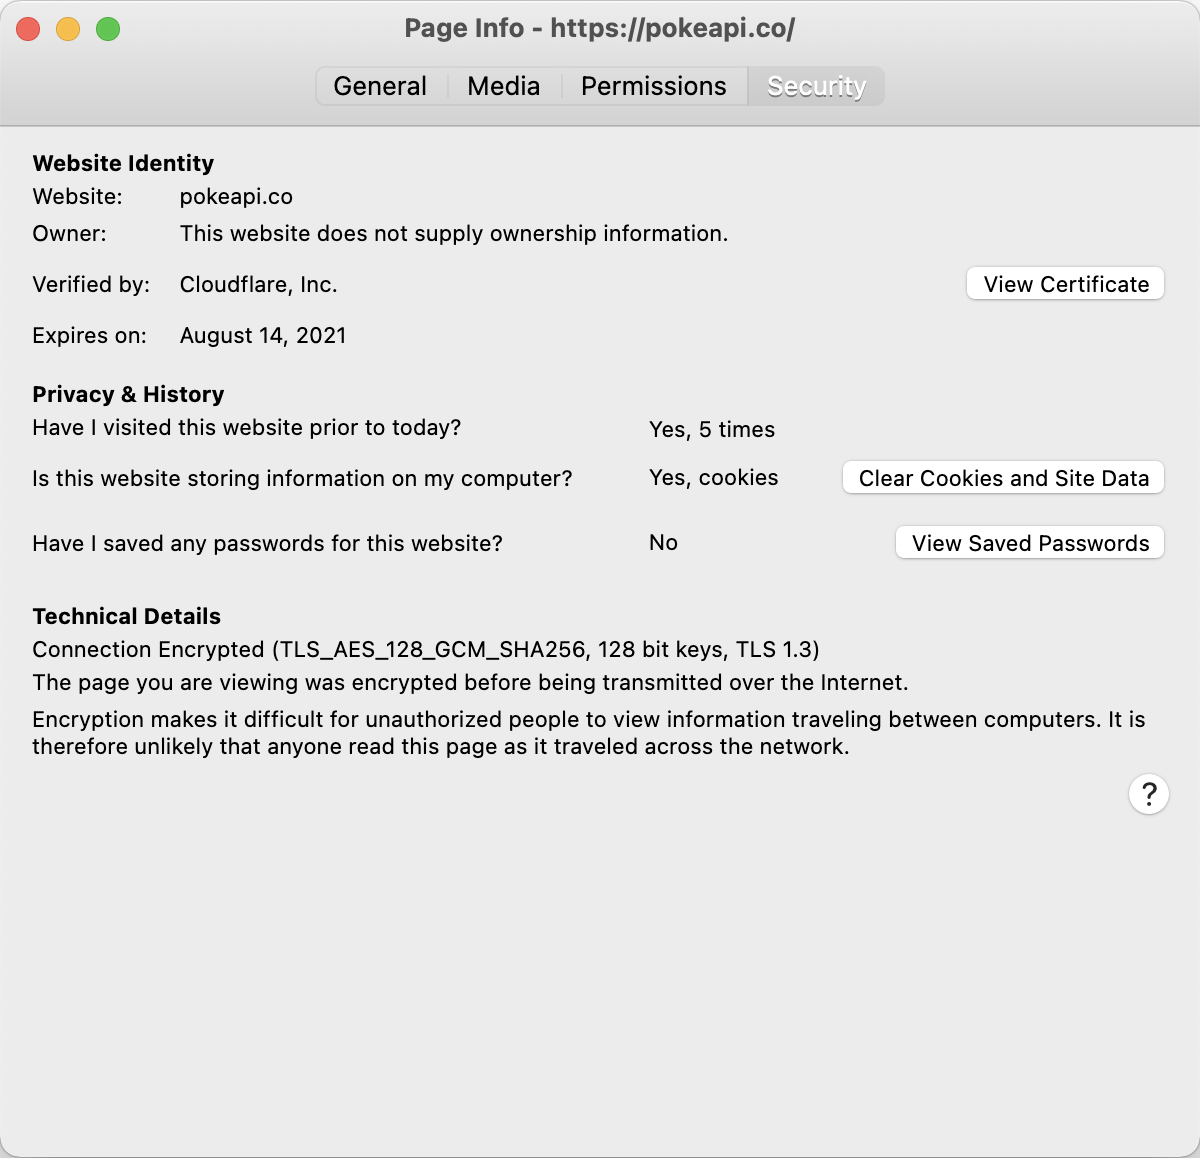
When clicking on the option that allows us to see the certificate, a new tab will open in the browser, showing us a series of headers. Normally there will be three elements, and the first one that is selected is the one we care about.
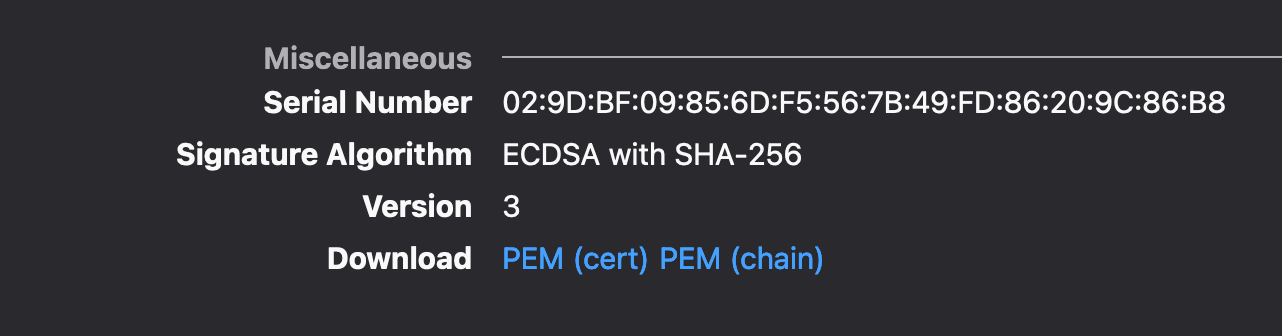
The point here is to be able to download the .pem file of the server certificate. The other options that can be seen are the intermediate certificates and the certificates from the issuing entities that are part of the chain of trust between certificates.
Moving down a bit on the tab that contains the certificate information, we’ll find the option to download the certificate within the Miscellaneous section. The option we’re interested in is the first one, PEM (cert), which will download only the server certificate.
-----BEGIN CERTIFICATE-----
MIIEvjCCBGSgAwIBAgIQAp2/CYVt9VZ7Sf2GIJyGuDAKBggqhkjOPQQDAjBKMQsw
CQYDVQQGEwJVUzEZMBcGA1UEChMQQ2xvdWRmbGFyZSwgSW5jLjEgMB4GA1UEAxMX
Q2xvdWRmbGFyZSBJbmMgRUNDIENBLTMwHhcNMjAwODE0MDAwMDAwWhcNMjEwODE0
MTIwMDAwWjBtMQswCQYDVQQGEwJVUzELMAkGA1UECBMCQ0ExFjAUBgNVBAcTDVNh
biBGcmFuY2lzY28xGTAXBgNVBAoTEENsb3VkZmxhcmUsIEluYy4xHjAcBgNVBAMT
FXNuaS5jbG91ZGZsYXJlc3NsLmNvbTBZMBMGByqGSM49AgEGCCqGSM49AwEHA0IA
BO3d/E4ml2Adhff/ziIlpAr+ULUlG3RyG+fxngarxdh/8h2p3ChO+0EWSOo1y5rN
ryTIKgUcafhwYI3Q0ApzgHyjggMHMIIDAzAfBgNVHSMEGDAWgBSlzjfq67B1DpRn
iLRF+tkkEIeWHzAdBgNVHQ4EFgQUwQrggFiZrQJLGp2FJqeYx+qMKC4wOgYDVR0R
BDMwMYIMKi5wb2tlYXBpLmNvghVzbmkuY2xvdWRmbGFyZXNzbC5jb22CCnBva2Vh
cGkuY28wDgYDVR0PAQH/BAQDAgeAMB0GA1UdJQQWMBQGCCsGAQUFBwMBBggrBgEF
BQcDAjB7BgNVHR8EdDByMDegNaAzhjFodHRwOi8vY3JsMy5kaWdpY2VydC5jb20v
Q2xvdWRmbGFyZUluY0VDQ0NBLTMuY3JsMDegNaAzhjFodHRwOi8vY3JsNC5kaWdp
Y2VydC5jb20vQ2xvdWRmbGFyZUluY0VDQ0NBLTMuY3JsMEwGA1UdIARFMEMwNwYJ
YIZIAYb9bAEBMCowKAYIKwYBBQUHAgEWHGh0dHBzOi8vd3d3LmRpZ2ljZXJ0LmNv
bS9DUFMwCAYGZ4EMAQICMHYGCCsGAQUFBwEBBGowaDAkBggrBgEFBQcwAYYYaHR0
cDovL29jc3AuZGlnaWNlcnQuY29tMEAGCCsGAQUFBzAChjRodHRwOi8vY2FjZXJ0
cy5kaWdpY2VydC5jb20vQ2xvdWRmbGFyZUluY0VDQ0NBLTMuY3J0MAwGA1UdEwEB
/wQCMAAwggEDBgorBgEEAdZ5AgQCBIH0BIHxAO8AdgD2XJQv0XcwIhRUGAgwlFaO
400TGTO/3wwvIAvMTvFk4wAAAXPsGBnRAAAEAwBHMEUCIANDBwmRfQuryBQGuJEC
jrQpU5gEjxdz/oFLrIlhgzsOAiEA8oCU/zVLpBmSFgXSOnbQyRhQgBV9PYmcAI6p
+F7ApEEAdQBc3EOS/uarRUSxXprUVuYQN/vV+kfcoXOUsl7m9scOygAAAXPsGBn9
AAAEAwBGMEQCIDcY6cPBaLt7+6aOKLZUn1ke3DhnObmXcYlJ3pa8jVu9AiBwAgik
HldztAA2V0bRbny+mBmwhxjwJfYpO/MEOCJ20TAKBggqhkjOPQQDAgNIADBFAiAf
SveArpf/TS8nWvx58hjlZZFSgus5CI/Tqg7ws9Nm0wIhALJSYFQM6oHVOJHvYHrb
UvrcjElb+g5XwjIEeFVJudnI
-----END CERTIFICATE-----
Step 2: Convert the PEM file into a Dart variable
To be able to use the certificate, we need to convert the content of the .pem file into a Dart variable, which can be used when building the object that will allow us to make HTTP queries.
With this goal in mind, I created a small gist that can be used to convert this file into a Uint8List type variable.
We prepare the directories and the script to execute the conversion of the files.
To execute the script, we simply go to the directory where our script is located and execute the following:
dart main.dart
Upon completion of the execution, a new file should appear in the generated directory. The content of that file should be similar to this:
import 'dart:typed_data';

Uint8List certificate = Uint8List.fromList([
  45,
  45,
  45,
  ...
  45,
  13,
  10
]);
With this we’ll have our certificate ready to be used in our requests!
Step 3: Include the certificate in the HTTP client
In this step, we’re going to create our HTTP client to be able to start sending our requests to the PokeAPI server. For this, we’ll see some points to take into account.
Include the dependency for the http package
# ...
dependencies:
  flutter:
    sdk: flutter
  http: ^0.12.0+2
# ...
With the following lines, we can generate the HTTP client with the certificate included.
import 'package:http/http.dart' as http;
import 'package:http/io_client.dart';

import 'sni-cloudflaressl-com.dart';

SecurityContext securityContext = SecurityContext(withTrustedRoots: false);
securityContext.setTrustedCertificatesBytes(certificate);

HttpClient httpClient = HttpClient(context: securityContext);

http.Client client = IOClient(httpClient);
- import ‘sni-cloudflaressl-com.dart’; Import the file that contains the variable with the certificate information.
- withTrustedRoots: false We specify that we don’t want to include the certificates from the issuing entities.
- securityContext.setTrustedCertificatesBytes(certificate) We set the trusted certificate in the SecurityContext using the certificate variable.
- http.Client Create the http.Client from the IOClient that can include the certificate.
Step 4: Test a request to the API
We put together everything we saw, and using our new HTTP client that already includes certificate pinning, we make the API call to query the data we’re looking for.
String result;

try {
  http.Response response = await client.get(
    'https://pokeapi.co/api/v2/pokemon/pikachu',
  );
  result = response.body;
} catch (exception) {
  result = exception.toString();
}
With the code above, we’re asking PokeAPI for the data of the Pokemon Pikachu. If our request is successful, it will return text in JSON format with all the Pokemon information; otherwise, it will return an error.
If you want to see a clearer example of certificate pinning implementation, you can check the Github repository where I show both a successful case and a failed one.