My first custom mechanical keyboard
The journey of designing and building a custom mechanical keyboard from scratch, including component selection and assembly process.
A few years ago, I discovered a completely new and very exciting world: mechanical keyboards. I’ve always liked creating things with my hands, which is why I became very fond of this expensive and uncommon hobby.
Today, it’s more common to hear about mechanical keyboards. In the gaming world, they became completely viral when various streamers and professional gamers started mentioning that they use this type of keyboard for the reliability they offer when pressing keys.
Previously, it was a little-known hobby, comprised of elite groups of people who understood both electronics and programming to turn the most incredible ideas into computer keyboards.
While there’s a lot of information on the Internet about this topic, this post is more of an appreciation of something I did some time ago: building a keyboard completely from scratch.
When I say from scratch, I mean from scratch, with nothing in my hands and an idea in my head.
1. The idea
My idea was to make something that would fulfill some desires I had after spending a couple of years mainly using two keyboards: the CODE Keyboard and an Ergodox.
In my mind, the keyboard had to meet the following points:
- Ergonomic and ortholinear, like the Ergodox.
- Separated into two specific sections for each hand but built as one piece.
- Just the right distance between both sectors for each hand.
- Directional arrow keys in inverted T format.
- Specific keys for page jumps and going to the beginning and end of each line.
- Use the keycap format of a standard keyboard.
Those were the foundations of the concept I had been planning. In the end, the final design result was as follows:
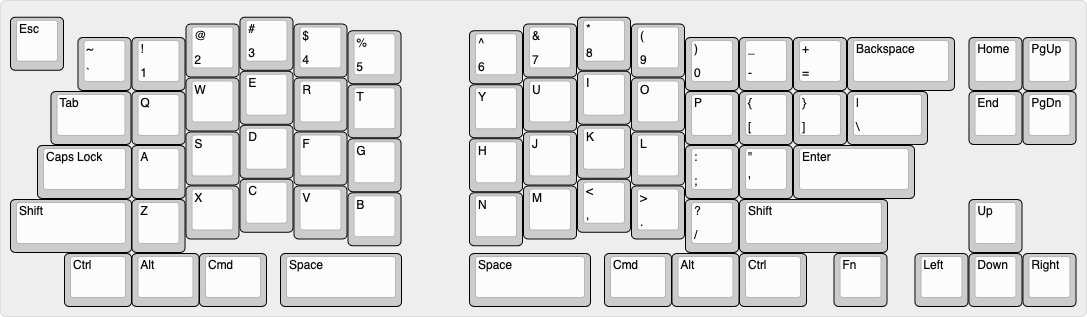
With this in my head, the next step was to get the pieces to start assembling the keyboard.
If you want to make your own version, here’s the link to the Keyboard Layout Editor site where I configured this design.
2. The parts
Ultimately, there was no keyboard plate with anything similar to what I wanted, so there was no possibility of using a PCB since I didn’t know how to design one. The solution was hand wiring.
What I needed to assemble the keyboard, besides the common things like cables and a soldering iron, was the following:
- Microcontroller: Arduino Pro Micro.
- Switches: Gateron Yellow.
- Diodes: 1N4148.
- Lubricant: Chrysto Lube MC 129.
- Stabilizers: Cherry type for plates.
- Cables: 22 AWG thickness.
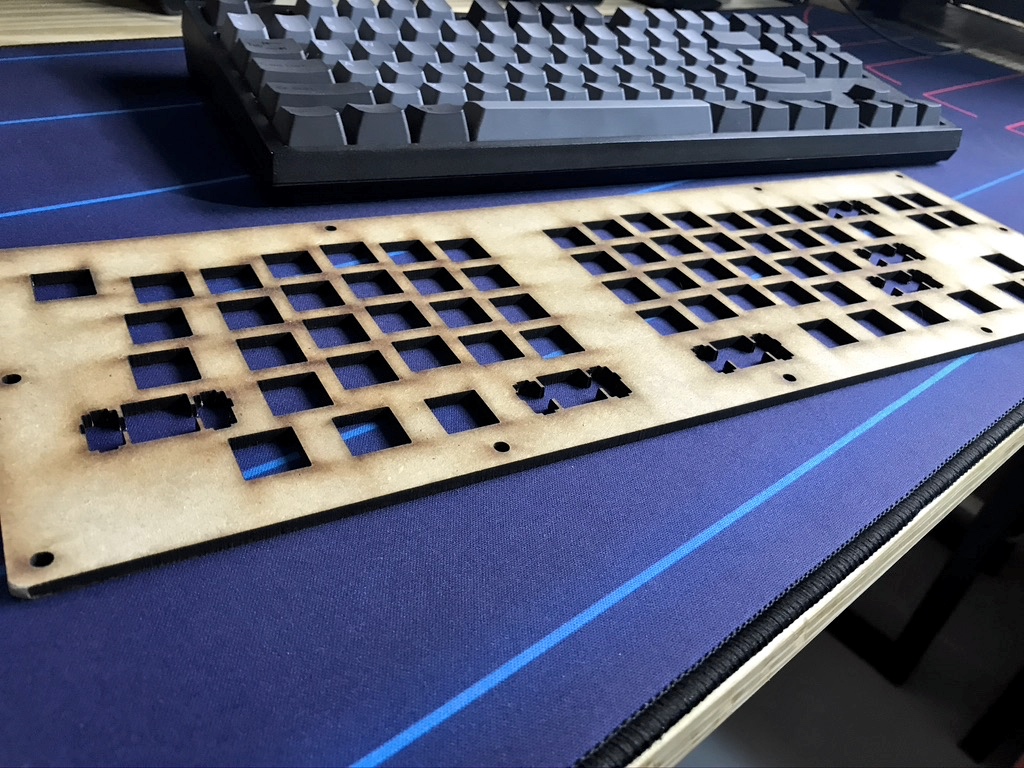
- MDF cuts: Plates made with laser cutting for sandwich-type assembly.
- Keyset: Chocolate Keycaps with SA profile.
- Silicone: to seal the switches through the plate.
- Soldering iron, solder, and a multimeter.
3. Assembly
As a first step, I started by lubricating the switches. I disassembled each one, lubricated them, and reassembled the more than 70 switches needed for this keyboard.
The next task was to mount the switches on the MDF plate and then secure them using silicone. This way, the switches are secured to the plate, which reduces flex when typing and makes it easier to swap keycaps.
Once the silicone dried and the switches were sufficiently secured, I proceeded to solder the diodes to each switch.

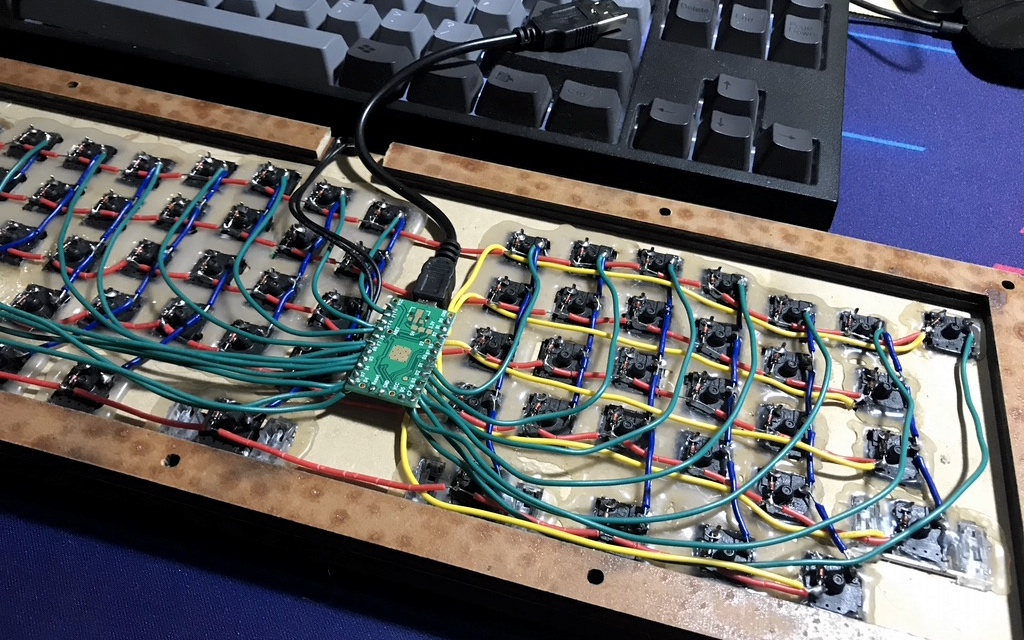
Once the diodes were in place, the hand wiring step began, which basically consists of the following:
- A cable must be soldered for each diode to form the rows (red cable).
- A cable must be soldered for each switch forming the columns (blue cable).
- Each complete row must be soldered to the microcontroller (yellow cable).
- Each column must be soldered to the microcontroller (green cable).
With patience, you can successfully perform each solder joint without any cables touching each other.
The next step was to go to the Keyboard Firmware Builder site, copy and paste the design (RAW Data) from the Keyboard Layout Editor website, and start modifying the pin layout so it would work with the number of pins that the Arduino Pro Micro has.
Once the pin layout was established and the keyboard layers were configured, I exported the configuration to a .hex file and then flashed the Arduino. DONE!
4. Final result
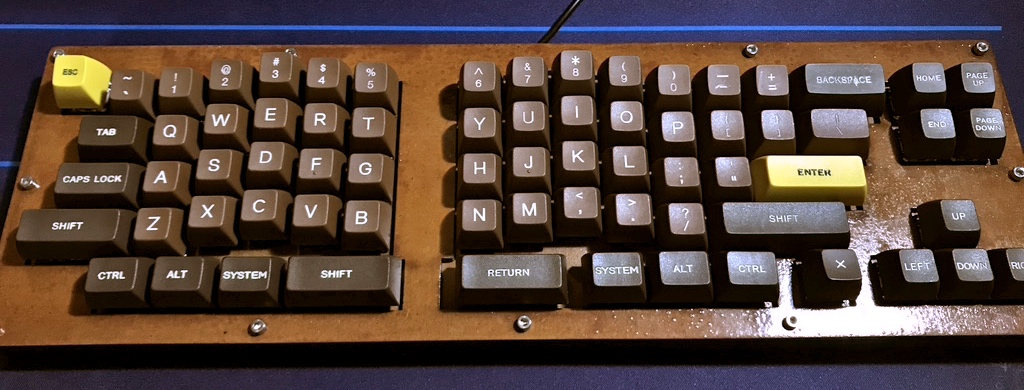
It’s a keyboard that undoubtedly brings together several of the characteristics I was looking for. I will definitely make a next version, perhaps with better detail in the construction process.
As I remember specific details about the keyboard construction, I will update this post.
5. Typing test
The best part of building something for yourself is when you can start using what you built.
I’m always open to giving recommendations about mechanical keyboards if anyone is interested. Contact links are below.
Here’s a video of how the keyboard looks and sounds when typing :)


